Normalize audio online to a loudness target
To normalize audio online, drop your file above, keep the Normalize mode, and pick a target such as -14 LUFS. The tool measures the loudness the EBU R128 way, applies one gain to reach the target, and holds peaks under -1 dB. Then you get the same format back, with the before and after numbers.
By The Loudmend team (Product and testing). Last updated .
How to normalize an audio file, step by step
Drop an MP3, WAV, M4A, AAC, FLAC, OGG or OPUS file into the box above.
Pick a target: -14 LUFS for streaming, -16 for podcasts and voice, -11 for loud social clips, or -23 for broadcast.
Press play to hear roughly how loud the result will be.
Export. The tool measures the file, applies the gain and checks the result.
Read the loudness and peak numbers, then download the file.
The first 3 runs each day are free. After that, see the pricing page for packs and plans, or read how we test the tool.
Normalize audio online tested on a real quiet file
We ran this page's own test file through the same engine you use, with the settings the tool opens with. So the waveform and the numbers below are exactly what came back, measured the EBU R128 way.
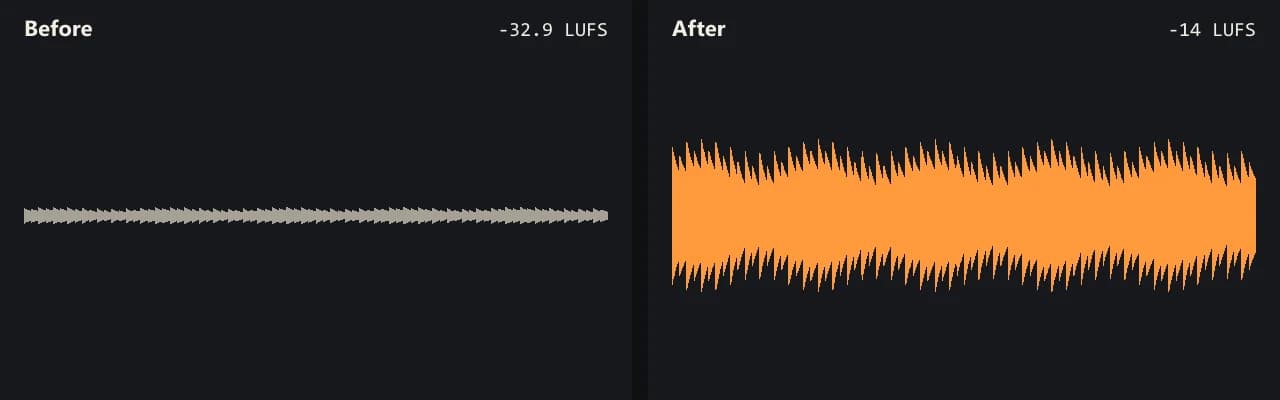
Same clip, same moment: switch while it plays. The after version is much louder, so start with your volume low.
- Test file
- quiet-music.mp3 (20 s music, 192 kbps)
- Export
- Normalize to -14 LUFS, MP3 256 kbps
- Loudness before
- -32.9 LUFS
- Loudness after
- -14 LUFS
- Peak before
- -25.3 dB
- Peak after
- -6.4 dB
- Change
- +18.9 dB
- Server time
- 1.5 s
How we test: every guide runs its own quiet test file that we recorded ourselves, and we listen to each export. More on the about page.
What LUFS means
LUFS stands for Loudness Units relative to Full Scale. It measures how loud a file sounds to people, not just how high its tallest peak goes. The method comes from ITU-R BS.1770, which weights the frequencies our ears care about and averages loudness over the whole program.
The scale is negative, so a number closer to zero is louder. For example, -14 LUFS is louder than -23 LUFS. One LU is the same size as one dB, so moving from -24 to -14 means adding 10 dB of gain.
EBU R128 is the European broadcast rule built on that measurement. It sets a target of -23.0 LUFS for TV and radio programs, and it describes how to measure the loudness of a whole program.
Peak vs loudness: two ways to normalize audio online
Peak normalization moves the loudest sample to a set level, often 0 dB or -1 dB. Audacity's Normalize effect works this way. However, it says nothing about how loud the file feels. One sharp clap can stop the whole track from rising, so two peak normalized files can still sound very different.
Loudness normalization targets the average loudness instead. That is what streaming apps do. Spotify, for example, adjusts tracks to -14 LUFS measured with ITU 1770, and Apple asks podcasters for about -16 LUFS with peaks under -1 dB.
This tool uses loudness normalization with a peak guard. It applies one linear gain, so the dynamics stay as they were, and a limiter at -1 dB catches the peaks.
Which target to pick when you normalize audio online
Pick -14 LUFS for music or video that goes to streaming services and YouTube. Pick -16 LUFS for podcasts, audiobooks and voice. Use -11 LUFS only for short social clips that must compete with loud feeds. Finally, choose -23 LUFS for broadcast delivery under EBU R128.
In our test, a quiet 20 second MP3 at -32.9 LUFS hit the -23 target exactly, at -23.0 LUFS. Meanwhile, a quiet interview at -34.2 LUFS, normalized to -14, landed at -15.1 LUFS with the peak at -0.8 dB.
That second case shows a real limit. When a recording is very peaky, the -1 dB ceiling wins, and the result can sit up to about 1 LU under the target. The tool runs a second pass when heavy limiting leaves it short.
When normalization is not the answer
Normalization changes level, nothing else. It cannot repair a file that clipped during recording, and it raises background noise with everything else. Also, if one person in a recording is much quieter than another, a single gain keeps that gap. Voice lift is the better mode there, because it raises quiet words more than loud ones.
Loudness targets and where they come from
| Target | Typical use |
|---|---|
| -14 LUFS | Streaming music and video (Spotify adjusts tracks to -14) |
| -16 LUFS | Podcasts and voice (Apple Podcasts recommends about -16) |
| -11 LUFS | Loud short clips for social feeds |
| -23 LUFS | Broadcast TV and radio under EBU R128 |
| Peak ceiling | -1 dB, held by the limiter |
| Measurement | ITU-R BS.1770, integrated over the whole file |
Normalize audio online FAQ
Can I normalize audio online for free?
Yes. You get 3 free exports a day with no account and no watermark, for sound up to 10 minutes long.
What dB should I normalize audio to?
For loudness, think in LUFS rather than peak dB. Use -14 LUFS for streaming, -16 for podcasts and -23 for broadcast, with peaks under -1 dB.
Can I normalize MP3 audio online?
Yes. The file comes back as an MP3 at 256 kbps. WAV and FLAC files stay lossless.
Can I normalize video audio online?
Yes. Drop the video itself. Only the sound track goes to our server, and the picture stays a bit for bit copy.
What does normalize audio mean?
It means changing the level of a file to hit a set target. Peak normalization targets the loudest sample, while loudness normalization targets how loud it sounds overall.
Is LUFS the same as dB?
Not quite. A change of 1 LU equals a change of 1 dB, but LUFS measures perceived loudness over time, while a peak in dB is a single sample.
Does normalizing reduce quality?
No, the gain itself is clean, and the limiter only touches the highest peaks. Lossy formats such as MP3 do get one new encode.
How is this different from normalizing in Premiere or DaVinci Resolve?
The goal is the same. Here you skip the project and the export settings: you drop the file, pick a target and download.
Related guides
Try it on your own file
Three exports a day are free. Your video stays in the browser; only the sound track is processed.